Wednesday, June 24, 2009

It's coming, it's coming!!


The little glimpse I saw before totally left me hanging for more...Now here is more. I couldn't be more excited if I tried. :D

Credits:
1, 2, 3, 5: USA Today
4: Liquid Sky Arts

Fifteen..


Happy Sweet Fifteen, my Baby..

Credit: Julzappa

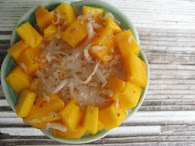
Sticky Mango Bliss..


Dh and I were looking for a good green mango chutney recipe, since we have a pile of them here to use up. Along the way we saw this recipe for Mango Sticky Rice.


We have mangoes in the back yard. The next day, I drove past a pile of coconuts that someone had picked off their tree and were giving away. Obviously, it was meant to be.


Yes...it really is as yummy as it looks in the pics. :p

The recipe I tried to follow is in that above video link, but I changed it up a little, so if anyone is in the mood, here is the recipe:

1 cup sweet (mochi) rice
1 cup water

3/4 cup coconut milk
1/4 cup water
1/3 cup fresh grated coconut (or a couple tablespoons dried)

1/2 cup fresh, grated coconut, (or a couple tablespoons dried), additional to the above amount

1 cup coconut milk
1/2 cup sugar
1 tsp salt (I missed this part, and I totally regretted it...I recommend YOU don't miss it)

fresh mangoes


Soak the first two ingredients, the rice and water, together for 30 min. Add the next three, put on stove and bring to a boil (WATCH this part, cause it will very easily stick and burn if you aren't paying attention! Give it the random stir on the bottom as it heats.) Turn it down to a simmer, and cook for 15 min, til the rice grains are no longer crunchy and undone.

While that is cooking, toast the remaining coconut on medium-low heat, til toasty-golden brown. Stir frequently so it doesn't burn.

Mix the next three ingredients together into a sauce. When the rice has cooked, pour half the sauce in, toss it through, and then add the rest. At this point, it's going to look a little sloppy. Let it sit for 20 min or so, to absorb some more sauce, and to cool a little, or a lot, depending on how you like it.

Serve with cut up mangoes alongside. Yum!

Credit:
Many thanks to John Mitzewich on About.com for the recipe, and very instructional video to go with it. :p

Sunday, June 21, 2009

In Spanish..


I have zero idea what she is saying, but it is just so creepy and amazing. The creativity you find out there is just incredible.

Cover girl..

Megan Fox isn't my favorite actress, and I hate reading fashion mags, but I stopped dead when I saw this month's cover..


There's just something about a backless dress..gets me everytime..

Saturday, June 20, 2009

Dedication..

I can't decide if these people are insane, or just have waaayyyyyy too much time on their hands. Either way, this is one helluva achievement!


(Spotted on Jorth)

Thursday, June 18, 2009

Camera Obscura..

I saw this vid over on Tam's blog, 1/4 of an Inch, and since then have been back three times to watch it. Might as well move it over here where I can always find it. :p


Such a bouncy song for such sad lyrics.

Sunday, June 14, 2009

Argh,,,

The last couple months, Blogger has TOTALLY messed up all my comments settings...I've been trying to fix them all, but I can't figure out this one. Can someone tell me how the heck to have my reply email address show up in the comment notification emails you get when I post a comment?? I thought I was supposed to click the Show Email button in my settings, but that's clicked, and nothing is happening. Argh! It used to work fine, but not any more, and I can't find an answer anywhere!!!

Saturday, June 13, 2009

Sand...


Wow. Just, wow.

Sunday, June 07, 2009

Send me a song..

Does anyone think 213 bloglines feeds are just too many to leave unattended for 3 months? Yeah, me, too...sigh. If anyone is wondering why I haven't dropped by your blog in months, that would be why. I am trying to systematically read through them ALL, cause I refuse to miss out on a SINGLE THING all you fabulous people have been doing while I have been out of commission. But holy moly...some of you have over 200 posts unread!!!! What the heck!! I feel positively lazy. Sheesh. :p

Okay..on to my real post...


I want to hear something new...so send me your song!! What are you listening to lately? What is catching YOUR fancy??? Tell me!

This one is Katie Melua...I love this version.

Saturday, June 06, 2009

Japanese hairband tutorial..


Okay, I said before that I was putting together a tut for a different style of Japanese hairpins, but I changed my mind, and made it into one for hairbands, instead. :p If you want them to be hairpins, you just put them on hairpins, rather than a band. (I apologize in advance for the blurriness of the pics...my good camera is waiting to go to the camera hospital, and I am stuck with a REALLY PATHETIC one. Argh.)

Okay..let's get started.


1. Cut out your circle of fabric. For the size I have on the hairbands, I cut out a circle 3 inches in diameter. But you can make them bigger or smaller, depending on how you feel. I have a set of bobbypins with a tiny 1/4"/half cm flower on each one that is SO CUTE. :p To make those, I used a 1.5" circle, in a fine silk.

2. Sew a running stitch all around the edge.


3. Pull the thread gently, to gather up the edges into a tight gather in the middle. Stitch off to secure.


4. Okay, this is where the sucky camera got in the way. When I get my other camera fixed, I am re-doing this one. What you are doing here is flattening the gathered circle, and then carefully measuring off five equal points around the edge, like a five pointed star. Take a tiny stitch at each point, leaving the thread stitch following behind, making a hexagon shape, pretty much. Make sure you take that last stitch back where the first stitch is, too. This is easiest to see from the smooth, non gathered side. Don't stitch off.


5. Now...flip back over to the gathered side, and carefully tug your five points together by pulling up the stitch thread, gathering the fabric over the bunched up middle where you had gathered before. As you pull, you will see five petals forming out of your circle. The threads in the five point stitches will try to slide to the back, and you will need to ease the threads back onto the front as you pull, so the petals all meet up in the middle. Pull the thread firmly to hold the petals in place, and then stitch straight down the middle, out the bottom, and then back up and then back down again in the exact same spot. Don't clip the thread tail; you will use this to sew your flower onto your hairband or clip at the end.


6. Thread up a contrast thread on a needle, make a tiny knot, stitch straight down into a fold so the knot gets hidden, and out the bottom, and then back straight up again. Keeping a single thread, take random, individual stitches, spraying out from the middle, like stamens, going out and back up the same hole on the bottom each time. You can see in the second pic how this keeps a very neat back to the flower. You can use these stitches to readjust some of the petals, too, if you need.

When you are done with those, pull the thread together into a double thread, and pull back up through the middle one last time.


7. Make a random scattering of french knots over the middle area of the stamens with the doubled contrast thread.


8. Now, attach to whatever you feel like. :)


9. Done. :) If you have any questions, or something is wildly unclear, post here or email me, and I'll try to clarify it! I promise, though, that these are actually really simple and easy, even if the description is hugely wordy. lol

Friday, June 05, 2009

Fishies...


Two beat up, raggedy barstools, bought at a garage sale for $5/pair. A couple of scraps of Japanese style bark cloth donated by a friend. Leftover paint also donated by a friend. A monumental amount of staples. I love love love 'em. :D

Thursday, May 28, 2009

Live your dreams..


This one makes me cry. Every.Single.Time.

Rain..


It's been raining off and on all day, and for days. I can't get my laundry done properly. The ground is muddy.

And yet, sometimes, sitting as the drops fall, this is how you feel.


Credit:
Burcindrummer via Creature Comforts

Wednesday, May 27, 2009

It's good to be reminded occasionally..


Okay, it's an ad..but that doesn't change that it is an exceptionally nice reminder of the things that really matter.

Credit:
Absolutely Beautiful Things via Wide Open Spaces

Sunday, May 24, 2009

Been playing around...

My sewing scene is pretty chaotic, or pretty non-existent, actually, right now..but I had my bag of kimono fabrics just sitting there...with my cute little French handsewing case sitting with it. Result:


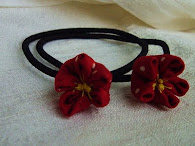
Made with the same technique as my Japanese Hairpin Tutorial, but with hairbands, obviously. The fabric is vintage kimono silk, and the bead is coral.

Hey, has anyone ever made hairpins using my tut?? I would LOVE to see pics!!!

Oh, I have another Japanese hairpin tutorial almost done, too...a different style. I thought I had posted some like it ages ago, but I can't find it. Oh, well, it's a surprise, then! :p

Three Hundred..

Whoa...I hit New Post, and happened to notice that my post count was 300..how the heck did that happen????? I should have had something planned!

Oh, well...figure something out. In the meantime, just dropped by to put this vid up. Seen it around, and really getting to like it.

Thursday, May 21, 2009

Crossfront Tut coming...

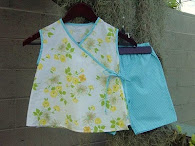
I made this ages ago, for demonstrating a tutorial on how to make a crossfront swing top out of a basic t-shirt pattern (I hope there is interest for it, cause I've already done most of the work! lol). Apparently, I missed a couple of pics of the construction, so the tutorial is on hold til I track the outfit back down (because I went and gave it away BEFORE organizing all my pics) and retake them. In the meantime, here is the outfit.


It used to be an Ottobre toddler knit t-shirt. Now it's a woven crossfront swing top. It fits perfectly on the recipient. I am so proud. :p

The shorts were also Ottobre, but one, I don't remember which ones, and I can't check cause they are all stuck in storage somewhere, and two, I resized them up about two sizes, and then changed them up a little, so the pattern number is almost irrelevent by now.

Saturday, May 16, 2009

I need some new jewellery..


I've decided I need some new jewellery. I wonder if she would be up for some swapping? Me being broke and all. :p

Credits:
All from RealisationCreations, found via Anastasia Drawing and Dreaming

Thursday, May 14, 2009

Stand By Me..

Okay..so, for a long, long time, my alltime, favorite song was Stand By Me, by Ben E. King. Which means, I have heard a lot of versions, as you do when you love a song. A few were decent, a very large amount were ear-bleeding...


This version, otoh, is hands down the best one I have ever heard aside from the original. And the story behind it is just as cool.
Related Posts with Thumbnails