


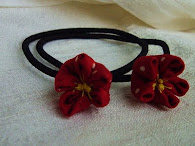
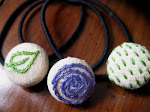
Okay, I said before that I was putting together a tut for a different style of Japanese hairpins, but I changed my mind, and made it into one for hairbands, instead. :p If you want them to be hairpins, you just put them on hairpins, rather than a band. (I apologize in advance for the blurriness of the pics...my good camera is waiting to go to the camera hospital, and I am stuck with a REALLY PATHETIC one. Argh.)
Okay..let's get started.

1. Cut out your circle of fabric. For the size I have on the hairbands, I cut out a circle 3 inches in diameter. But you can make them bigger or smaller, depending on how you feel. I have a set of bobbypins with a tiny 1/4"/half cm flower on each one that is SO CUTE. :p To make those, I used a 1.5" circle, in a fine silk.
2. Sew a running stitch all around the edge.

3. Pull the thread gently, to gather up the edges into a tight gather in the middle. Stitch off to secure.

4. Okay, this is where the sucky camera got in the way. When I get my other camera fixed, I am re-doing this one. What you are doing here is flattening the gathered circle, and then carefully measuring off five equal points around the edge, like a five pointed star. Take a tiny stitch at each point, leaving the thread stitch following behind, making a hexagon shape, pretty much. Make sure you take that last stitch back where the first stitch is, too. This is easiest to see from the smooth, non gathered side. Don't stitch off.

5. Now...flip back over to the gathered side, and carefully tug your five points together by pulling up the stitch thread, gathering the fabric over the bunched up middle where you had gathered before. As you pull, you will see five petals forming out of your circle. The threads in the five point stitches will try to slide to the back, and you will need to ease the threads back onto the front as you pull, so the petals all meet up in the middle. Pull the thread firmly to hold the petals in place, and then stitch straight down the middle, out the bottom, and then back up and then back down again in the exact same spot. Don't clip the thread tail; you will use this to sew your flower onto your hairband or clip at the end.


6. Thread up a contrast thread on a needle, make a tiny knot, stitch straight down into a fold so the knot gets hidden, and out the bottom, and then back straight up again. Keeping a single thread, take random, individual stitches, spraying out from the middle, like stamens, going out and back up the same hole on the bottom each time. You can see in the second pic how this keeps a very neat back to the flower. You can use these stitches to readjust some of the petals, too, if you need.
When you are done with those, pull the thread together into a double thread, and pull back up through the middle one last time.

7. Make a random scattering of french knots over the middle area of the stamens with the doubled contrast thread.

8. Now, attach to whatever you feel like. :)

9. Done. :) If you have any questions, or something is wildly unclear, post here or email me, and I'll try to clarify it! I promise, though, that these are actually really simple and easy, even if the description is hugely wordy. lol


7 comments:
I can't wait to try this! I actually think I can do it!
I am still adoring my beautiful bobby pins.
Looks great. I may whip up a couple of those for barrettes for my daughter.
That is so cute! Looks like a good summer project for my girl.
These are so pretty! Thanks so much for sharing, I'll be linking.
Pretty AND easy! Looks like I'll need to whip up some of these headbands in the near future. :)
How darling. But small does not make it easier for me to make.
Love it. thanks for sharing
Post a Comment