


Okay, so about ten and a half squillion years ago, I promised a tut to alter a basic tee pattern into a crossfront top. Looking at that old post, I had been preparing it ages before that, too. Oy.
Well, I'm doing it now. Heh. Let's get going, yeah? (BTW...if you need a better look at any of the pictures, just click on one for a larger version. )

1. Find your tee pattern. You want it to be the size you want to make, so things like the shoulder dimensions and armhole depth will work. Trace out the back piece, so you have the back neckline done already. My pattern was a half pattern, as most tee patterns will be..so trace the one half..

2. ...and then flip and trace it again on the other side, so you have a complete tee shape.

3. Okay, this step is one a lot of people don't think of, but is crucial for a nice, smooth fit. Take a ruler, or any straight edge, and right at the corner of the inner shoulder, make a straight line about 1/2" down (1.5cm), at right angles to the shoulder line.
The reason you do this, is so the join to the back piece will make a nice smooth curve over your shoulder, rather than meeting in a point, as two angled lines meet, which is what would happen if you just drew down from the shoulder across the front. (If that makes absolutely no sense, try drawing it out, and look at it, or else ask me, and I will elucidate some more. :p )

4. On the other side, where you want to cross to, make a mark at the point you want the cross to meet at the side. Don't go too far down, unless you are really daring, and have some good doublesided tape, or a nice undershirt. :p

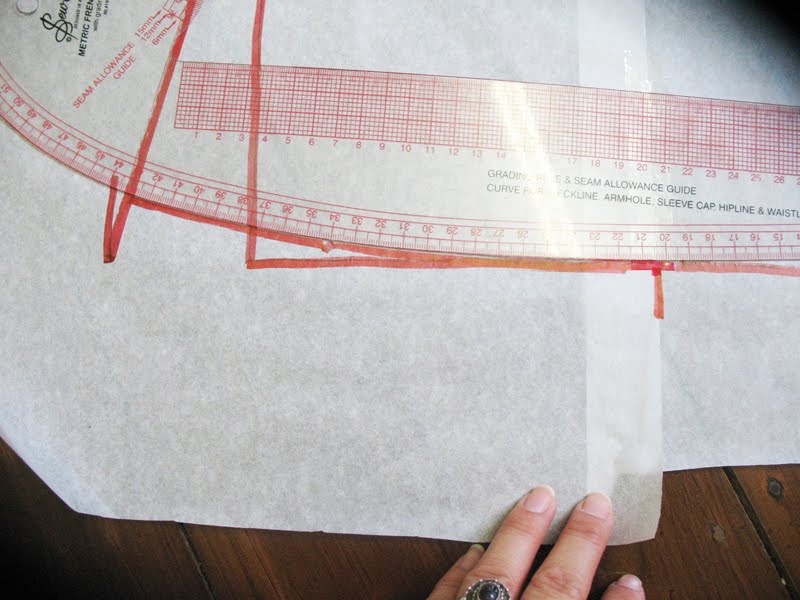
5. Now, here, I use a French curve, one of the greatest inventions known to man, but you can just eyeball it, and make a smooth, curved line across the front. You want it to drop smoothly off the little line you drew at the shoulder, and then curve gently across the front to meet up with the mark at the side. A gentle curve will hug the curve of the body better, resulting in a nicer fit, and a better look.

6. On the other side of the shoulder, where the sleeve would usually go, make a mark like you made at the shoulder neck, about 1/2" in, and redraw the armscye down to the original underarm. This step simultaneously removes that extra little fabric that kind of sticks off the shoulder when you just drop the sleeves from a pattern, and also increases the size of the armscye, which you will need, since a tee shirt is usually knit, and we are making a woven, which could be too tight without the extra space added, or a knit fabric used.
If you are keeping the sleeves in your own pattern, ignore this step, of course. :p

7. At the bottom corner, make a mark out from the side, the distance you want your swing top to swing out to. I did about 2 inches here.

8. Using a ruler or a straight edge, draw a line down from the underarm to the bottom edge of the mark. I don't have a picture, but you will repeat on the other side exactly the same for the back, and drop it down to where the crossfront meets for the front.
9. Mark exactly the middle of your pattern, and then draw a smooth, curved line up to the line you drew at the side. This is going to be your hemline. Don't do it too deep, otherwise you are going to end up with a shirttail hem, lol. The reason you do this, if you don't know (and a lot of people don't know!) is so you don't end up with points at the sides, where two straight corners would meet up on your hem.

10. Repeat on the other side. Now, you are done drafting, it's time to make your working pattern pieces.

11. Take more tracing paper, and trace off a front and a back piece off your master pattern. The back is outlined in light blue, the front is outlined in dark blue. The front piece will work for both sides, so you only need one. I forgot to do it on both pictures, but if you enlarge this one, you can see on the first pic the different lines I drew for the front and back sides where the crossfront is. (Yes, yes, I know, my mouse skills stink. )

Ta-da! A working crossfront pattern! (Okay, I forgot to take pictures of the other piece, and I ditched it in the move, so you are just going to have to imagine a back piece sitting here, too. :p )
Coming soon (way, way sooner than last time): Pt 2: Sewing up. :D
Can people let me know if I really messed up anything here, or if it is wildly unclear? And I would LOVE LOVE to see anything you make from it! :D
UPDATE: Find part 2 HERE:


4 comments:
this was so interesting! I clicked on you because you left that cute little hawaii comment on my blog yesterday and wow I'm just so impressed. I love to sew and I've always wanted to learn to make patterns. I sometimes alter patterns a little but nothing major. I love that little ottobre dress a couple posts down too. I may just have to look that one up!! I also really love the Oliver + S patterns. anyway thanks for dropping by! I will have to check back to see what other fun tutorials you come up with :)
jill
ok i don't know how to RE: a comment. pretty lame huh?!
I have a shirt pattern that I like to alter into a dress as well. Last summer I got super bored (cuz I live in AZ and it gets so hot here you can barely want to go outside) but anyway I started sewing ALOT and decided to open an etsy store. Well needless to say fall came and I got busy with photography again so no shop yet. i have the name and everything. it will be called ibby loves you. I suspect I will get bored again this summer :)
I got this dress from Anthropologie, its really beautiful but its waaay to short for me. I am going to return it but i need to take a pic first because I want to see if I can somehow copy the top, shrink to kids size and then add a full skirt on the bottom. haha not too ambitious am i?? It's just really pretty its like a shirt dress but no collar and it has pin tucks and a little ruffle down the front out of thin delicate fabric. Man now if I could do that I'd be so happy!!
jill
Ooooh...so sweet! I've been messing around with pattern-making lately, which is why this post caught my eye on One pretty Thing.
Very nice!
What a pretty shirt! Thank you for posting a tutorial showing how to get the pattern from a t-shirt pattern. I've been moving more and more into drafting my own patterns (out of frustration with store-bought patterns that NEVER fit).
I linked to your tutorial on Craft Gossip Sewing:
http://sewing.craftgossip.com/tutorial-draft-and-sew-a-childs-crossfront-top/2010/04/05/
--Anne
Post a Comment