


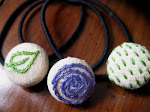
Since I was making a set anyway, I finished off the tutorial I have had in the works for, um, close to two years, lol.
These are fairly simple to make; just a little fiddly and time consuming. But really pretty, imo!
You can click on each picture for a larger view, if you need, though I think they are fairly simple to figure out without it.

To begin: Cut a circle of fabric (I used a gatorade cap, since it was the right size for the result I wanted), and stitch a line of running stitches all around the edge. If you are using a flimsy fabric, like I am, cut another circle of a firmer fabric, and stitch them together at the same time with the running stitch. Use a long line of thread, at least 18 inches, to be used in the next steps.

Put a bit of polyfil in the middle, and pull the running stitches tight, to make a little ball shape.

Bring the needle and thread up exactly through the middle, and bring around and under and through again. Pull tight firmly. Repeat four more times, to make five equal "petals". Bring the needle and thread up through one more time.

String a bead on, and then stitch back down; come back up, through the bead and down several more times, to secure it firmly. Stitch the thread to secure on the underside.

Cut out two circles the same size as the flower out of your leaf fabric. Fold in half and then in quarters, and run a line of stitching along the open edge.

Pull the stitches tight, to gather, and stitch back and forth a couple times to secure. Knot off or back stitch the thread to hold it.

Cut out yet another leaf circle, same size, and a small circle of thin cardboard, big enough to cover the back of the flower without hanging out and being seen from the front. Run a line of stitching around the outside of the fabric circle, and pull tight around the cardboard one, covering it.

I forgot to show it, but here, you arrange the leaves on the back of the flower, in an attractive manner, at the same time keeping the ends so they don't show out from under the cardboard circle that you are going to stitch over the back of everything to cover all the raw ends.

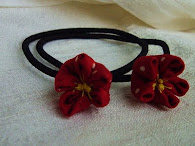
Stitch securely to the back of your hairpin. I would assume you can use whichever kind of hairpin you want. I just happen to like this kind.
Done. :)
Let me know if anything is unclear, or completely unintelligible, lol! I hope you like my tut, and show me if you make one, too!!


13 comments:
I just LOVE that little flower! Like an itty bitty pin cushion. I am definitely putting it on my list of things I want to make : )
These are beautiful! Thanks for the fantastic tutorial. I'm going to give these a go .... I know some little girls who would love these for Christmas.
Wow, how gorgeous! I know a host of little girls (and probably some big ones too) who would LOVE these for Christmas!
Oh wow, that's fabulous!
They would make great Christmas pressies for some little girls I know. Bookmarking this one right away!
I am with everybody - a great tut just in time for Chrissy and more importantly maybe some for myself.
beeuuutiful
Yes, this is a really good tutorial. I'm going to try it too--as a present for myself!
I love making these! I haven't done any for ages, I should do some more before Christmas!
i just found you, and you apparently just found me . . . *smile*
you were a bit late for my giveaway - i think there is a bit of lag time out there in cyberworld? anyway, i will be having another in the near future. it was fun!
i love the flower tutorial - i will have to try one soon! how pretty!
thanks for stopping by - hope you do so again!
bitsofsunshine.typepad.com
Great tutorial! Thanks for sharing.
i've always wanted one of these, and I looked all over Japan for one in colours that suited me... now I can have creative control! Thanks for sharing the tutorial with everyone.
bex
http://adeedwithoutaname.wordpress.com
cute...I bought some in japan and never thought of making them!well done
Nice tutorial. I've been searching for someone to describe it this easily. Pretty too.
Post a Comment