Showing posts with label jewellery. Show all posts

Sunday, September 11, 2011

Twisted..


Garnet briolettes and teeny, tiny peridots, all twisted up on silver hoops. Now dd wants me to make HER a pair...gonna have to be different colors, though..I never did get into the matchy-matchy..so not my thing. :p


Playing along at:


Tip Junkie handmade projects

Todays Creative Blog


Sunday, March 20, 2011

A learning experience..


This here is a last glimpse of my most recent learning experience. I learned how to make ball headpins, using sterling wire and a propane torch (AWESOME!!! :D ). I learned to not just wrap at will, and pay attention, or you will end up uneven. I learned a photo will show you that it WASN'T your imagination, and something def was askew. And I learned I need to be more aware of earrings in my ear, even if they are so extremely comfortable, or I will never know when one disappears, and won't even know where to begin to look for it, esp if I went out all day, and then again all evening, wearing them. :(

They sure were pretty, though, weren't they? :)


 UndertheTableandDreaming 

Sister Sister Sunday


Tuesday, January 04, 2011

Lashes and lashes..


I think...I want to put on the pair third one down, and go find a party somewhere worthy of them. 


Saturday, July 17, 2010

How to make a jewellery hanger..


Okay, well, I told my friend I had made this jewellery hanger, and was planning a tut. Not only did she love it, but she ran out and bought the supplies, and is now sitting there tapping her fingers waiting. Uh. Okay. Better get onto it. (I actually think she is PERFECTLY capable of working it out herself, but what the hey..I already have the pictures taken, right? :p


Supplies needed:

Wood plaque or panel

Paper of your choice

9 cup hooks

picture hanger thingie

paint

spray glue

med grit sandpaper

ruler

a nail and a hammer


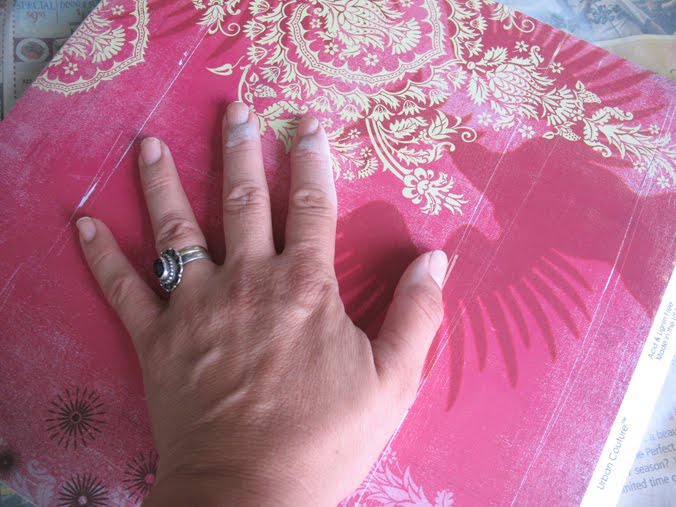
First thing, make your wood and your paper match exactly in size. My paper and my plywood square are both exactly 12" x 12".


Sand the edges smooth. If you really want to be picky, you can go over them again with a fine grit paper, for a finer finish. I didn't bother, cause I knew if I didn't get on with it, I would flounder and fail and migrate to the couch before it was done. :p


Paint the edges. I used spray paint, cause that is what I had, but I would have preferred to use a brush on paint...it would have filled the gaps a bit better and looked nicer. It did go a lot faster, though! :p


While you are at it, paint the hooks, too. Let them dry while you finish the rest of the project. If you do use brush on paint with these, don't paint the screw part..it will just get messy when you put them in.


Spray the back of your paper with spray adhesive. Don't overdo it so that it seeps through to the front. Just a good coat on all parts. Make sure you get the corners and the edges, so they don't peel back up with wear and age. Also spray the front side of the wood panel.


CAREFULLY match up the edges of the paper and the wood, and lay the paper down. It will be very hard if not impossible to reposition it, so take this step slow. Smooth it on, making sure to press on the edges and corners, too. My scrapbooking paper had this white edge with their info on it that I had to cut off.


Now you make the grid for where you want to put the hooks. I did nine hooks, so I divided my board into a grid of two inch squares. How I did it was mark an infinitesimal dot at the edges on two opposing sides at each two inch mark. Lay a straight edge of the ruler along the line between a mark on one side, and the opposing mark on the other side, and mark a tiny dot at each two inch mark. You should end up with a grid of nine dots in the middle, spaced every two inches. (Let me know if I got this step wrong. I SUCK at this kind if mental math, and can't remember if I needed to do anything else to make it work.)


At each dot, take your hammer and nail, and tap it in about 1/8-1/4" (.5 cm approx), to make a starter hole. Pull the nail back out carefully so it doesn't twist and mark up the hole. Don't go farther down, cause pulling it back out will make a mess and cause damage.


Screw the hooks into the starter holes til they are flush with the surface. Make them end all facing up.


Attach my professionally named picture hanger thingie (I'm totally brain fritzing and can NOT remember what these are called) to the back...my one, btw, IS straight, no matter what is bizarrely going on in the picture.


Ta da!!! Turn back around to the front, hang on a wall, and drape your favorite jewellery across it. :D


As always, let me know if I have any errors, and show me if you make one!! :D


Playing along at:


  UndertheTableandDreaming The Girl Creative


Organize and Decorate Everything
 

Friday, April 30, 2010

Hangups..


I've been wanting a display for my necklaces for awhile, and finally got around to making one. It's a piece of plywood, painted white on the sides, and a sheet of scrapbooking paper on the front. I wish I could have found better hooks, but I'll live, for now. :p I love the paper I used for the background (which, btw, is actually red, and the big flourish on the right is celadon, but it all got washed out, and now looks the dreaded pink), and have been hoarding it for a couple of years, while I figured out what to do with it. I think it worked out well, don't you? :D

(Oh, I figured I might as well take pictures while making it, so look for a tutorial on it in the future, when I get myself organized. :p )


Have jumped in and joined Today's Creative Blog's Get Your Craft On link party...you should jump over and have a peek...there are 318 links before me...that's a lot of crafting to see!

Saturday, May 16, 2009

I need some new jewellery..


I've decided I need some new jewellery. I wonder if she would be up for some swapping? Me being broke and all. :p

Credits:
All from RealisationCreations, found via Anastasia Drawing and Dreaming

Thursday, December 18, 2008

BT4!

Pauline, of Pog and Em, has received my BackTack 4 swap package, so I can post now! Woohoo! :D

The theme was Gold, Frankinscence, and Myrrh. Which translates as, something shiny or gold (Gold), something for the senses, that you can taste or smell or whatever (Frankinscence), and something special just for them (Myrrh).

So.

Gold:


I drew the image, making a composite of a few different pics I found on the net, onto linen, and embroidered it. I didn't do the faces, because 1. I liked the style of the linen as a detail of the image, and 2. I really hate how hard it is to translate an expression on a face using just thread, which made the decision for me (Jesus, btw, used to look a lot cuter til I tried to draw him in permanent ink on my final piece AFTER all the embroidery. Argh.) :p Then I made the back Star of Bethlehem, sewed them together and put circles of cardboard and fleece inside for body, and beaded around the edge, to both pretty it up, and hide the hideous join of the two sides! lol


Frankinscense:


I made these as hotpads, for putting pots on, and scenting the air at the same time. Linen, and vintage print edging them, and then filled with whole spices..cinnamon quills, cloves, cardomom seeds, oh, and ground ginger, cause I had no dried ginger pieces. And it made it all through customs!! Woohoo! lol Anyway, Pauline is using them as sachets in her bedroom, and now I am in love with the idea of a spice scented bedroom (they are STRONG scented...I stored them in my sewing room while I finished the rest of the package off, and my whole sewing room smelled delicious, lol!) My first photo of these were front on, side by side. Yeah. I had to retake them. Just was not what I was going for! rofl

And Myrrh:


The just for her part got a little overboard..I kept adding one more thing and one more thing, while waiting for the yarn to arrive. The yarn is hand dyed, supersoft, and the most beautiful colors..If I were a yarn artist like Pauline, I would have been sorely tempted to hoard it myself. :p

The flower pin is made the same way as my poppy pin, but in dark blue, and clear teardrop shaped beads in the middle.

And then a little zip bag from a vintage...something...I am not sure what it was, but I *think* it was a teatowel...or something. Natural colored coarse weave, almost like burlap, but from cotton, and softer, with woven in stripes of aqua. And then I bound the inside seams, because the weave was so loose, with an aqua binding, but the less said about that, the better. Really. :p

And, of course, some chocolates. Gotta have some choc, right?? :p

Thank you, Pauline, for a wonderful swap! And thank you to the BT4 team for organizing!

Thursday, December 11, 2008

So, so pretty...


Okay, handstamped silver disc pendants are everywhere now, but that's not stopping me from becoming OBSESSED with them!! :D There's just something about them. So adorable. :p
Related Posts with Thumbnails