Showing posts with label patterndrafting. Show all posts

Friday, March 26, 2010

How to make a crossfront tut, Pt 2..


Okay, so let's put your new pattern to use! You've drafted it, and cut it out...let's put it together. :D

Maybe I better tell you what to cut out, first. Heh. Important. :p

You are going to want to cut out:

1 back piece

2 front pieces (If the fabric is not the same on front and back, make sure you have two pieces facing opposite to each other.)

enough bias binding to: bind the armholes; wrap from the edge of one front piece, around the neck, and down the other front piece; with enough to swing freely off one side as a tie, and another strip for a tie at the side. Prob around 4 feet, for a smaller outfit (this one was size 5.) I made my own, about 1 1/4" wide unfolded, but you can buy premade bias tape. When the top is finished, the ties and binding from my homemade bias are about 1/3" (1cm) wide..not super wide. Premade bias will most likely give you a 1/2" (1.5cm) width. You can do however you want, though, of course.

You will also need one button, for the inner closure.


1. First thing to do, reinforce and sew the front and back shoulders together. You can use whatever you prefer for the stabilizer; I used a 1/4" ribbon here, cause it matched, and it was the right size, but I know some people use a small strip of selvage, or twill tape, etc. You want it to be firm, so it helps the shoulder hold it's shape through repeated wears and washes, and doesn't stretch out on the bias, which the shoulder is usually cut on. 


2. Apologies, I didn't get a pic of this first part. But cut a strip of bias tape, long enough to be the tie at the side, press both edges inwards, fold in half edge to edge, and sew down one side to make a strip like the picture below. Once that is made, find the spot you wanted the tie to be, and pin it in a sandwich between the front and back pieces, at the side mark. You want the tie to be INSIDE the sandwich, inside the top. 


3. Sew down the side seams, with the strip sandwiched in (sew up and down a few times right across where the tie is, to reinforce it), so that when you flip it right side out, it looks like this. Maybe a little straighter, though. I am shocking about getting things to stick in a straight line when I sew, lol. Repeat on the other side, minus the tie. We are doing something different over there. :p By now, you should have something resembling a top, with armholes and everything. 


4. This is a totally dumb pic, and I have no clue what I was thinking, but it is supposed to show the next step. You want to fold over and hem the edges of the front panels, and the bottom hem, so they meet up at the corners like this. 


5. A couple things going on here. First, take your bias strip, pin it to the INSIDE of the front panel that is going to cross UNDER the front, RIGHT SIDE of bias to WRONG SIDE of front panel. Got that?? Important! You are going to leave about three inches sticking off the end of the side that is crossing UNDER the front. Don't forget that, either. 

Now, sew it all around the neckline, attaching it. The remainder of the tape, just let hang off the end that crosses OVER the front, as the tie that will meet up to the other one you previously tucked into the side. If they don't meet up, and are on opposite sides, don't freak out; just undo the strip and redo it the other way, so it DOES meet up. Simple. Once it's all sewn on properly, trim the long end to the right length for a tie, plus a couple extra inches, and set aside the extra for the armholes (MAKE SURE YOU SAVE ENOUGH FOR BOTH ARMHOLES!)

Now, trim off the bulk of the seam allowance, as shown on the top section. You don't want a chunky, bulky stiff neckline, right?


6. Another dumb pic. What you are supposed to be doing here, is flip the bias tape up, and press, including the little bit hanging off. You want a nice fold. Now, fold the top of the strip down, to the halfway mark, like in the pic, and press this. Now you have this super easy strip to just complete folding over to enclose the raw edge of the neckline, binding it. So, fold over, and sew along the edge of the strip, all along the neckline, enclosing it, continuing off and making that remaining bit of strip into a tie of itself. Got it? Is that understandable? I might be totally off my rocker here..you gotta tell me! :p 


7. This is what is happening on the other end..you have made this super easy self tie to tie at the side. 


8. So, this is how you make the inside closure. Take that little strip hanging off that you made before, that little three inch bit, and fold it back on itself, to the inside, making a loop big enough for the button you are going to use. Sew back and forth across it, to make a secure loop. Trim off any excess strip once you've sized it to the button, and sewn it. 
Now, go to the other side, where you made that long tie, all nice and neatly bound. Be sneaky, and snip off about 1.5 inches off the end. Go back to where you are making the inner closure, fold your purloined strip in half, and sew the ends securely TO THE SEAM ALLOWANCE, not the garment itself. That could end up funny if you did that. And not in a good way. Once you have your little tab there, sew on a little button to it, to match the loop you already made on the front panel. 


9. Okay, here...you are going to be binding the armholes. So, as before, match the RIGHT SIDE of the tape to the WRONG SIDE of the garment. Fold the beginning bit back about 1/4 inch, and pin in place. Sew it all around the armhole, ending just past where you started. Trim off any excess. The previously folded back bit makes an automatically finished end when you flip it over and sew all along the edge of the strip, like shown below. 


10. Trim off all loose threads, and give the curved armholes a heavy steaming (that means, hold your iron on full steam just ABOVE the bias binding, NOT put it down on top of it, or slide back and forth) to help pull it back in shape from being stretched while sewing. 


11. Wa La. You are done. If you want the cute shorts, too, you might need to find another pattern. I can't remember what I altered to get these. :p

As usual, PLEASE let me know if I messed something up, so I can fix it, and PLEASE show me if you make something from this! I would LOVE to see! :D

If you are coming in late to the party, you can find part one here:

Wednesday, March 24, 2010

How to make a crossfront swing top from a tee pattern, Pt 1..


Okay, so about ten and a half squillion years ago, I promised a tut to alter a basic tee pattern into a crossfront top. Looking at that old post, I had been preparing it ages before that, too. Oy.

Well, I'm doing it now. Heh. Let's get going, yeah? (BTW...if you need a better look at any of the pictures, just click on one for a larger version. )


1. Find your tee pattern. You want it to be the size you want to make, so things like the shoulder dimensions and armhole depth will work. Trace out the back piece, so you have the back neckline done already. My pattern was a half pattern, as most tee patterns will be..so trace the one half..


2. ...and then flip and trace it again on the other side, so you have a complete tee shape. 


3. Okay, this step is one a lot of people don't think of, but is crucial for a nice, smooth fit. Take a ruler, or any straight edge, and right at the corner of the inner shoulder, make a straight line about 1/2" down (1.5cm), at right angles to the shoulder line. 

The reason you do this, is so the join to the back piece will make a nice smooth curve over your shoulder, rather than meeting in a point, as two angled lines meet, which is what would happen if you just drew down from the shoulder across the front. (If that makes absolutely no sense, try drawing it out, and look at it, or else ask me, and I will elucidate some more. :p )


4. On the other side, where you want to cross to, make a mark at the point you want the cross to meet at the side. Don't go too far down, unless you are really daring, and have some good doublesided tape, or a nice undershirt. :p


5. Now, here, I use a French curve, one of the greatest inventions known to man, but you can just eyeball it, and make a smooth, curved line across the front. You want it to drop smoothly off the little line you drew at the shoulder, and then curve gently across the front to meet up with the mark at the side. A gentle curve will hug the curve of the body better, resulting in a nicer fit, and a better look. 


6. On the other side of the shoulder, where the sleeve would usually go, make a mark like you made at the shoulder neck, about 1/2" in, and redraw the armscye down to the original underarm. This step simultaneously removes that extra little fabric that kind of sticks off the shoulder when you just drop the sleeves from a pattern, and also increases the size of the armscye, which you will need, since a tee shirt is usually knit, and we are making a woven, which could be too tight without the extra space added, or a knit fabric used. 

If you are keeping the sleeves in your own pattern, ignore this step, of course. :p


7. At the bottom corner, make a mark out from the side, the distance you want your swing top to swing out to. I did about 2 inches here. 


8. Using a ruler or a straight edge, draw a line down from the underarm to the bottom edge of the mark. I don't have a picture, but you will repeat on the other side exactly the same for the back, and drop it down to where the crossfront meets for the front. 


9. Mark exactly the middle of your pattern, and then draw a smooth, curved line up to the line you drew at the side. This is going to be your hemline. Don't do it too deep, otherwise you are going to end up with a shirttail hem, lol. The reason you do this, if you don't know (and a lot of people don't know!) is so you don't end up with points at the sides, where two straight corners would meet up on your hem. 


10. Repeat on the other side. Now, you are done drafting, it's time to make your working pattern pieces. 


11. Take more tracing paper, and trace off a front and a back piece off your master pattern. The back is outlined in light blue, the front is outlined in dark blue. The front piece will work for both sides, so you only need one.  I forgot to do it on both pictures, but if you enlarge this one, you can see on the first pic the different lines I drew for the front and back sides where the crossfront is. (Yes, yes, I know, my mouse skills stink. )


Ta-da! A working crossfront pattern! (Okay, I forgot to take pictures of the other piece, and I ditched it in the move, so you are just going to have to imagine a back piece sitting here, too. :p )


Coming soon (way, way sooner than last time): Pt 2: Sewing up. :D

Can people let me know if I really messed up anything here, or if it is wildly unclear? And I would LOVE LOVE to see anything you make from it! :D

UPDATE: Find part 2 HERE:

Thursday, May 21, 2009

Crossfront Tut coming...

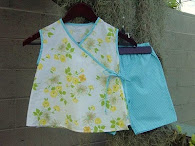
I made this ages ago, for demonstrating a tutorial on how to make a crossfront swing top out of a basic t-shirt pattern (I hope there is interest for it, cause I've already done most of the work! lol). Apparently, I missed a couple of pics of the construction, so the tutorial is on hold til I track the outfit back down (because I went and gave it away BEFORE organizing all my pics) and retake them. In the meantime, here is the outfit.


It used to be an Ottobre toddler knit t-shirt. Now it's a woven crossfront swing top. It fits perfectly on the recipient. I am so proud. :p

The shorts were also Ottobre, but one, I don't remember which ones, and I can't check cause they are all stuck in storage somewhere, and two, I resized them up about two sizes, and then changed them up a little, so the pattern number is almost irrelevent by now.

Sunday, May 18, 2008

Vintage sewing...


Do you ever want to learn millinery?


What about patterndrafting??


How to sew authentic period clothes?


Glovemaking?

Did you know some brave, brave living saints have taken it upon themselves to scan, upload, transcribe and cross-reference dozens of out of print, vintage books, covering all topics, from dressmaking, millinery, glovemaking, etc etc?? You can learn ANYTHING from them. They are thorough, detailed, clear, and a complete treasure trove; and those amazing souls who are doing this should be revered and all hail'd.


The books are from the 1800's, through to mid last century...they cover SOO much, after scanning through them, you are left with the feeling that if you read through all of them, there wouldn't be much left to know about sewing..they are that good.


This site, the Human Ecology Collection, has all the books scanned in, and each chapter/page set up so you can reach it with a click.


But THIS site, VintageSewing.info, has the books cross referenced by category, or by decade, and then each book individually typed in, illustrations placed, organized for easy use, etc etc etc. Basically, it's almost like holding the book in your hand, it's so easy to use.

If you have ever picked up a vintage garment, and studied the careful, beautiful work that went into it and marveled, here is where it is...you, too, can sew beautiful, new, vintage garments. :p

Saturday, April 26, 2008

Don't let them dress themselves...

So this is the top I made for dd, using my pattern. It's nothing super fancy, but it's what she wants, and also within my very noob-ly capabilities.


It's a smock top, with a bodice that only comes to just under the armpits (trying to figure out how to phrase this so it doesn't pop to the top of the google searches of dubious nature..yoicks). It fits well around the armscye, which I am very proud of. But, being the very beginner that I am, I am not sure about the back bodice...it seems a little loose...and being so inexperienced with all this, I am not sure if I messed up the measurements, or if there was something I should have adjusted when drafting that pattern off the sloper pattern. Hmm. Obviously, more practice is in order! :D

And why don't let them dress themselves?? Just look at her. She refused to change out of that gawdawful teeshirt first, and totally brought down the awesomeness of my creation. A travesty. Kids should just stay babies, and wear what is put on them. Should be a law, or something. Would make sewing for them a lot simpler, too! :p

Thursday, April 10, 2008

What's cool....

Very cool: Making your dd a pattern from scratch, with just a set of measurements, and a couple of tools.


Not so cool: Marking the patterns with the tracing wheel, on the hardwood floors. *cough* Yeah.

Monday, March 17, 2008

Pink is back...

Still going on the pink stuff....


Same pattern as Fairy dress, but with the ruffles done right. Did the button closure the same way, too. Next dress is the same pattern, too, but skip the ruffles, and extended the rest, to make it long enough.


The hem IS even...the pic is off. :p Same old linen fabric as before, with the same old stripey stuff...it's still the only stuff I have that remotely matches it.


This is what these dresses STARTED as, before I morphed the pattern out of recognition. For once, I didn't do anything to this pattern, just made it as is. Only the front has the shirring, so it looks funny not on someone.

This dress, I made up from scratch.


DD suddenly decided she needed a new party dress two days before the party, so we pulled out the fabric, and got going on it. I just draped fabric on her, and marked where I wanted to cut, and then put in darts to fit. It's a little old, so it's a little tight; it's got a zip and then button straps, so we could still squeeze it on, lol. The bodice is fully lined, too, and curves on the top down to a lower depth in back. I was really proud of how nice it looked for no pattern, and only a couple hours work, since I worked for a few hours on the first day, left it for a day, and then finished the zip and hem the morning of the day of. I LOVE the fabric, and wished it was my colors, lol. It's a satin, and I was really surprised with how easy it was to work with. I swear this was some designer offcut, too, since it was really beautiful to work with, and the print was awesome. :p

And since I have crafter's ADD, and can't focus on one task at a time, I took a break from the pink, and made myself some warm pants for the coming winter, since my house is an ICEBOX, and I have thin blood from growing up in Hawaii. :P They are mega basic, and in fairly cheap fleece, since I was just seeing if it would work, since I have issues with sewing for myself, but I think they came out just fine, for lounging around the house. lol


I used the pattern sloper I created in patterndrafting class, and then laid a pair of pants that I knew I liked over them, to get dimensions I knew I wanted...I have gained weight since the pattern drafting class (UGH!), but since this was for stretch pants, I knew it would be fine. Even then, it still came out a little baggy around the waist. And they aren't hemmed, since I messed up and cut one side a little short during the drafting of the new pattern, and they were the perfect length just as is, without taking up any. Anyway, I was happy enough with them, and now I have a new pair of warm, snuggly pants to get me through the misery of winter! lol Too bad I forgot to suck in my two-babies-and-two-c secs tummy for the picture. :eyeroll: :p

Friday, January 05, 2007

I can't believe I had to give this away!!


I made this for a swap, and then when it was done, I had to pry it out of my fingers and ship it away! Wah!

I had this awesome Asian print scarf, with little gold highlights, just waiting for the perfect project. Well, the project came along, and I didn't know how perfect it was going to be til it was done, and by then it was too late to make another bag to send! I am soo going to regret this for years!

The black is an awesome organic linen, made from a half finished pair of pants a friend abandoned; the lining is the same red stripey stuff from the Sha Sha bag, the clasp is another huge red Cinnabar bead; and the pattern is all mine.

Boring to everybody else but me....


I made PJ pants. Plain, boring, old PJ pants. From scratch. As in, this is the first workable garment I have ever made with my newly acquired patterndrafting skills. Awesome.
Related Posts with Thumbnails