




Showing posts with label Japanese stuff. Show all posts

Sunday, February 06, 2011

Vegetarian Japanese dumplings..aka gyoza..aka potstickers..


I adore Japanese boiled dumplings..I used to buy them in Sydney all the time, though not so much here, cause my budget is smaller here. :p

So when my sister, who was abandoning me and heading to the Mainland to live, gave me her little gadget to make them myself, I was all over it. I can't believe how incredibly simple they are to make, when they charge so much in the shops! I found a fantastic tutorial for making the pleats by hand here, if you don't have access to my handy-dandy gadget, so I'm putting up the recipe I made so you can try their awesomeness yourself. :p (I am not in any way recommending that meat filling she used, though...I am veggie all the way! :D )

Filling:

1 1/2 c shredded  wonbok (Napa cabbage or chinese cabbage) or cabbage

1/4 c diced fine onion

1/4 c minced shiitake mushrooms

1/8 c minced waterchestnuts

1 inch piece ginger, fine grated

10 oz block tofu, pressed to drain excess water and mashed

1 small clove garlic minced

splash sesame oil

salt and pepper to taste


Gyoza wrappers*


Combine all the filling ingredients in a pan, and fry til the cabbage is cooked, and dry rather than soggy.

Adjust seasoning as needed.

Take one wrapper, put 1-1.5 teaspoons of filling in the middle, wet the edges with water, and crimp, either with the tool like I have** or following that tut up above. Press the crimper really hard so the edges are properly sealed, and won't come open in the water while boiling. Very bland and soggy that way.

From here..I like to boil them. So I boil a pot of water to a gentle boil, and slip the dumplings in; boiling for 5 min or so, til they start to look translucent and cooked, like the pic above. Gently scoop out with a slotted spoon, and drain in a colander. 

Another way to cook them, though, is by frying in a pan, preferred by a lot of people. The girl in that other tut above actually has pictures of this process, too (actually, her whole tut rocks, minus the meat..just not vegetarian, and she isn't doing boiled like mine..so I'm going ahead with this one. :p )

Serve with your fave dipping sauce. I made one with just soy sauce, sesame oil, chilli flakes, and vinegar. So yum.

My filling makes approx 30 dumplings, and an average serve is 5-6 per person.


* This is a pic of the gyoza wrappers I use...you can also use wonton wrappers if that is all you can find.


**This is my awesome crimper. I find the handles aren't all that strong, and I end up just clamping the edges together by hand...but the whole thing is so worth having, so I don't mind. :p I also have a much larger size, for turnovers, but haven't gotten to try it yet. Can't wait! :D


Would LOVE to hear if you tried these, and let me know if there are any glaring errors in here! :D


Gyoza


 UndertheTableandDreaming


The Girl Creative


handmade projects


Wednesday, January 12, 2011

Oh...THAT army..


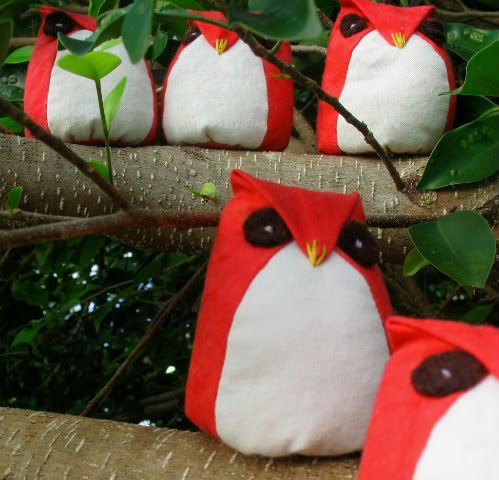
Meet my Army of Evil Minions.

I had seen Moonstitch's adorable "tutowlrial" a few years ago, and have had it sitting in my bookmark folder ever since. Til I got a request for beanbags in a swap, and knew this was PERFECT for them! :D I filled the top half with fiberfil, and the bottom half with rice...worked perfectly, with a great heft for tossing. All was going well, til I needed to do the eyes..the best material I had was this dark brown sweater I had felted ages ago, and I thought it would be just the thing.

So, made a couple up, sat back a little, and realized I was staring back at an army of evil little owls. Whoops. I hope she is feeling the need for some minions around the house! :D

PS: Her favorite color is orange, and also tiedye, of which I had neither. But I had a yellow based red fabric, so I made reverse tiedye with it, using bleach (you can't see it in the pic, but it looks really cool, and way more orange)...look for the coming tut!!

PPS: I didn't have the printer going, so I just drew my own pattern looking at her pics...result, my owls came out a little more high-and-mighty, versus chubby and cute. Prob contributed in no small part to the evil results.


Get your craft on Thurs.


Thursday, July 01, 2010

Plastic fantastic..


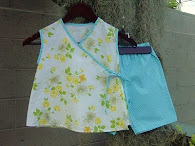
My dinky little local store actually got in a bunch of really nice feeling laminates..I *had* to try them. Combine that with dd's b-day, and her previously documented love of all things Japanese, and I had a project. And then a friend of hers had a b-day, too, so I doubled it. :p

I used this tutorial on Crafster, by QueenofDiy, who also has a blog here. I used some of it, and then when I got tired of walking back and forth to the computer from the sewing machine, I made the rest up. :p 

So, tip...if you are going to work with laminate, invest in a walking foot. Absolutely. One hundred percent. I have heard a teflon foot also works well, but I have only used the walking foot, and I don't think I will every use anything else. If you are DESPERATE, and I have been before, you can do laminate/vinyl sandwiched between tissue paper, and then just tear it away when done. But honestly, just buy the walking foot. You will NEVER regret it. :D 

Between the walking foot, and the simple instructions on the tut, this worked up VERY fast the second time around. The first time, I was still working out kinks, figuring things out, and also filling in gaps in information on the tutorial. (If anyone ever uses one of mine, and notices gaps that I don't cover, TELL me so I can rectify it!) The second time, I did it in like half or less of the time. :p


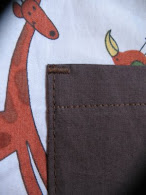
This is a blurry, very average picture of the lining. The polka dots are super cute. The looseness is totally not. I have to work out how to not have these loose linings all the time. I haven't seen it addressed in various tuts, etc, I have seen, but the info must be out there. Anyone know a place I should look? Please tell!


504 Main

Saturday, June 06, 2009

Japanese hairband tutorial..


Okay, I said before that I was putting together a tut for a different style of Japanese hairpins, but I changed my mind, and made it into one for hairbands, instead. :p If you want them to be hairpins, you just put them on hairpins, rather than a band. (I apologize in advance for the blurriness of the pics...my good camera is waiting to go to the camera hospital, and I am stuck with a REALLY PATHETIC one. Argh.)

Okay..let's get started.


1. Cut out your circle of fabric. For the size I have on the hairbands, I cut out a circle 3 inches in diameter. But you can make them bigger or smaller, depending on how you feel. I have a set of bobbypins with a tiny 1/4"/half cm flower on each one that is SO CUTE. :p To make those, I used a 1.5" circle, in a fine silk.

2. Sew a running stitch all around the edge.


3. Pull the thread gently, to gather up the edges into a tight gather in the middle. Stitch off to secure.


4. Okay, this is where the sucky camera got in the way. When I get my other camera fixed, I am re-doing this one. What you are doing here is flattening the gathered circle, and then carefully measuring off five equal points around the edge, like a five pointed star. Take a tiny stitch at each point, leaving the thread stitch following behind, making a hexagon shape, pretty much. Make sure you take that last stitch back where the first stitch is, too. This is easiest to see from the smooth, non gathered side. Don't stitch off.


5. Now...flip back over to the gathered side, and carefully tug your five points together by pulling up the stitch thread, gathering the fabric over the bunched up middle where you had gathered before. As you pull, you will see five petals forming out of your circle. The threads in the five point stitches will try to slide to the back, and you will need to ease the threads back onto the front as you pull, so the petals all meet up in the middle. Pull the thread firmly to hold the petals in place, and then stitch straight down the middle, out the bottom, and then back up and then back down again in the exact same spot. Don't clip the thread tail; you will use this to sew your flower onto your hairband or clip at the end.


6. Thread up a contrast thread on a needle, make a tiny knot, stitch straight down into a fold so the knot gets hidden, and out the bottom, and then back straight up again. Keeping a single thread, take random, individual stitches, spraying out from the middle, like stamens, going out and back up the same hole on the bottom each time. You can see in the second pic how this keeps a very neat back to the flower. You can use these stitches to readjust some of the petals, too, if you need.

When you are done with those, pull the thread together into a double thread, and pull back up through the middle one last time.


7. Make a random scattering of french knots over the middle area of the stamens with the doubled contrast thread.


8. Now, attach to whatever you feel like. :)


9. Done. :) If you have any questions, or something is wildly unclear, post here or email me, and I'll try to clarify it! I promise, though, that these are actually really simple and easy, even if the description is hugely wordy. lol

Friday, June 05, 2009

Fishies...


Two beat up, raggedy barstools, bought at a garage sale for $5/pair. A couple of scraps of Japanese style bark cloth donated by a friend. Leftover paint also donated by a friend. A monumental amount of staples. I love love love 'em. :D

Sunday, May 24, 2009

Been playing around...

My sewing scene is pretty chaotic, or pretty non-existent, actually, right now..but I had my bag of kimono fabrics just sitting there...with my cute little French handsewing case sitting with it. Result:


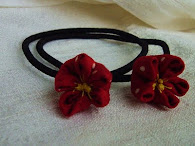
Made with the same technique as my Japanese Hairpin Tutorial, but with hairbands, obviously. The fabric is vintage kimono silk, and the bead is coral.

Hey, has anyone ever made hairpins using my tut?? I would LOVE to see pics!!!

Oh, I have another Japanese hairpin tutorial almost done, too...a different style. I thought I had posted some like it ages ago, but I can't find it. Oh, well, it's a surprise, then! :p

Saturday, December 13, 2008

Shoe biz..


Really...does this post even need words????

Okay, okay...a few. Came across Dames and Divas, via Melanie over at Kimono Reincarnate..apparently the former sources from the latter. I nearly fell off my chair with lust when I saw them. And then following the links, I found Hetty Rose, doing the same thing over in the UK. Somebody please help me justify the cost of getting a custom shoe that I won't actually be able to wear all that much, since I rarely, rarely get a chance to dress up and go out anywhere, and with my foot size and shape, I don't fit all that many shoes straight off the rack, without a LOT of trying on. There has got to be ONE good reason to blow the money, right??? :D


Edit: Dh did not laugh hysterically when I showed him these. Hmmmmmmm..... :D


Credits:
1. Style Discovery
2, 3, 4, 5. Hetty Rose

Friday, October 31, 2008

Sumi-e..

Japanese brush painting..


Simple..graceful..elegant..


..Really fricking hard to do. :sigh:

If you feel like giving it a try yourself, Youtube has a million really cool tutorials to teach you. I need to spend a lot more time with them. :P

Wednesday, October 22, 2008

How to make a Japanese Hairpin..


Since I was making a set anyway, I finished off the tutorial I have had in the works for, um, close to two years, lol.

These are fairly simple to make; just a little fiddly and time consuming. But really pretty, imo!

You can click on each picture for a larger view, if you need, though I think they are fairly simple to figure out without it.


To begin: Cut a circle of fabric (I used a gatorade cap, since it was the right size for the result I wanted), and stitch a line of running stitches all around the edge. If you are using a flimsy fabric, like I am, cut another circle of a firmer fabric, and stitch them together at the same time with the running stitch. Use a long line of thread, at least 18 inches, to be used in the next steps.


Put a bit of polyfil in the middle, and pull the running stitches tight, to make a little ball shape.


Bring the needle and thread up exactly through the middle, and bring around and under and through again. Pull tight firmly. Repeat four more times, to make five equal "petals". Bring the needle and thread up through one more time.


String a bead on, and then stitch back down; come back up, through the bead and down several more times, to secure it firmly. Stitch the thread to secure on the underside.


Cut out two circles the same size as the flower out of your leaf fabric. Fold in half and then in quarters, and run a line of stitching along the open edge.


Pull the stitches tight, to gather, and stitch back and forth a couple times to secure. Knot off or back stitch the thread to hold it.


Cut out yet another leaf circle, same size, and a small circle of thin cardboard, big enough to cover the back of the flower without hanging out and being seen from the front. Run a line of stitching around the outside of the fabric circle, and pull tight around the cardboard one, covering it.


I forgot to show it, but here, you arrange the leaves on the back of the flower, in an attractive manner, at the same time keeping the ends so they don't show out from under the cardboard circle that you are going to stitch over the back of everything to cover all the raw ends.


Stitch securely to the back of your hairpin. I would assume you can use whichever kind of hairpin you want. I just happen to like this kind.


Done. :)

Let me know if anything is unclear, or completely unintelligible, lol! I hope you like my tut, and show me if you make one, too!!
Related Posts with Thumbnails