


Okay, so let's put your new pattern to use! You've drafted it, and cut it out...let's put it together. :D
Maybe I better tell you what to cut out, first. Heh. Important. :p
You are going to want to cut out:
1 back piece
2 front pieces (If the fabric is not the same on front and back, make sure you have two pieces facing opposite to each other.)
enough bias binding to: bind the armholes; wrap from the edge of one front piece, around the neck, and down the other front piece; with enough to swing freely off one side as a tie, and another strip for a tie at the side. Prob around 4 feet, for a smaller outfit (this one was size 5.) I made my own, about 1 1/4" wide unfolded, but you can buy premade bias tape. When the top is finished, the ties and binding from my homemade bias are about 1/3" (1cm) wide..not super wide. Premade bias will most likely give you a 1/2" (1.5cm) width. You can do however you want, though, of course.
You will also need one button, for the inner closure.

1. First thing to do, reinforce and sew the front and back shoulders together. You can use whatever you prefer for the stabilizer; I used a 1/4" ribbon here, cause it matched, and it was the right size, but I know some people use a small strip of selvage, or twill tape, etc. You want it to be firm, so it helps the shoulder hold it's shape through repeated wears and washes, and doesn't stretch out on the bias, which the shoulder is usually cut on.

2. Apologies, I didn't get a pic of this first part. But cut a strip of bias tape, long enough to be the tie at the side, press both edges inwards, fold in half edge to edge, and sew down one side to make a strip like the picture below. Once that is made, find the spot you wanted the tie to be, and pin it in a sandwich between the front and back pieces, at the side mark. You want the tie to be INSIDE the sandwich, inside the top.

3. Sew down the side seams, with the strip sandwiched in (sew up and down a few times right across where the tie is, to reinforce it), so that when you flip it right side out, it looks like this. Maybe a little straighter, though. I am shocking about getting things to stick in a straight line when I sew, lol. Repeat on the other side, minus the tie. We are doing something different over there. :p By now, you should have something resembling a top, with armholes and everything.

4. This is a totally dumb pic, and I have no clue what I was thinking, but it is supposed to show the next step. You want to fold over and hem the edges of the front panels, and the bottom hem, so they meet up at the corners like this.

5. A couple things going on here. First, take your bias strip, pin it to the INSIDE of the front panel that is going to cross UNDER the front, RIGHT SIDE of bias to WRONG SIDE of front panel. Got that?? Important! You are going to leave about three inches sticking off the end of the side that is crossing UNDER the front. Don't forget that, either.
Now, sew it all around the neckline, attaching it. The remainder of the tape, just let hang off the end that crosses OVER the front, as the tie that will meet up to the other one you previously tucked into the side. If they don't meet up, and are on opposite sides, don't freak out; just undo the strip and redo it the other way, so it DOES meet up. Simple. Once it's all sewn on properly, trim the long end to the right length for a tie, plus a couple extra inches, and set aside the extra for the armholes (MAKE SURE YOU SAVE ENOUGH FOR BOTH ARMHOLES!)
Now, trim off the bulk of the seam allowance, as shown on the top section. You don't want a chunky, bulky stiff neckline, right?

6. Another dumb pic. What you are supposed to be doing here, is flip the bias tape up, and press, including the little bit hanging off. You want a nice fold. Now, fold the top of the strip down, to the halfway mark, like in the pic, and press this. Now you have this super easy strip to just complete folding over to enclose the raw edge of the neckline, binding it. So, fold over, and sew along the edge of the strip, all along the neckline, enclosing it, continuing off and making that remaining bit of strip into a tie of itself. Got it? Is that understandable? I might be totally off my rocker here..you gotta tell me! :p

7. This is what is happening on the other end..you have made this super easy self tie to tie at the side.

8. So, this is how you make the inside closure. Take that little strip hanging off that you made before, that little three inch bit, and fold it back on itself, to the inside, making a loop big enough for the button you are going to use. Sew back and forth across it, to make a secure loop. Trim off any excess strip once you've sized it to the button, and sewn it.
Now, go to the other side, where you made that long tie, all nice and neatly bound. Be sneaky, and snip off about 1.5 inches off the end. Go back to where you are making the inner closure, fold your purloined strip in half, and sew the ends securely TO THE SEAM ALLOWANCE, not the garment itself. That could end up funny if you did that. And not in a good way. Once you have your little tab there, sew on a little button to it, to match the loop you already made on the front panel.

9. Okay, here...you are going to be binding the armholes. So, as before, match the RIGHT SIDE of the tape to the WRONG SIDE of the garment. Fold the beginning bit back about 1/4 inch, and pin in place. Sew it all around the armhole, ending just past where you started. Trim off any excess. The previously folded back bit makes an automatically finished end when you flip it over and sew all along the edge of the strip, like shown below.

10. Trim off all loose threads, and give the curved armholes a heavy steaming (that means, hold your iron on full steam just ABOVE the bias binding, NOT put it down on top of it, or slide back and forth) to help pull it back in shape from being stretched while sewing.
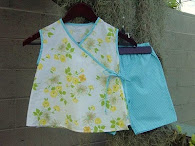
11. Wa La. You are done. If you want the cute shorts, too, you might need to find another pattern. I can't remember what I altered to get these. :p
As usual, PLEASE let me know if I messed something up, so I can fix it, and PLEASE show me if you make something from this! I would LOVE to see! :D
If you are coming in late to the party, you can find part one here:


4 comments:
This is fabulous! Thank you! I know it will be a while until I get around to making one, but when I do I'll send you a pic :)
its so cute and i love your fabric choice - happy little outfit!
Thank you so much for sharing these how-to posts! Now I have a new top to make. :)
Can't wait to make this!
Post a Comment