


Okay, well, I told my friend I had made this jewellery hanger, and was planning a tut. Not only did she love it, but she ran out and bought the supplies, and is now sitting there tapping her fingers waiting. Uh. Okay. Better get onto it. (I actually think she is PERFECTLY capable of working it out herself, but what the hey..I already have the pictures taken, right? :p
Supplies needed:
Wood plaque or panel
Paper of your choice
9 cup hooks
picture hanger thingie
paint
spray glue
med grit sandpaper
ruler
a nail and a hammer

First thing, make your wood and your paper match exactly in size. My paper and my plywood square are both exactly 12" x 12".

Sand the edges smooth. If you really want to be picky, you can go over them again with a fine grit paper, for a finer finish. I didn't bother, cause I knew if I didn't get on with it, I would flounder and fail and migrate to the couch before it was done. :p

Paint the edges. I used spray paint, cause that is what I had, but I would have preferred to use a brush on paint...it would have filled the gaps a bit better and looked nicer. It did go a lot faster, though! :p

While you are at it, paint the hooks, too. Let them dry while you finish the rest of the project. If you do use brush on paint with these, don't paint the screw part..it will just get messy when you put them in.

Spray the back of your paper with spray adhesive. Don't overdo it so that it seeps through to the front. Just a good coat on all parts. Make sure you get the corners and the edges, so they don't peel back up with wear and age. Also spray the front side of the wood panel.
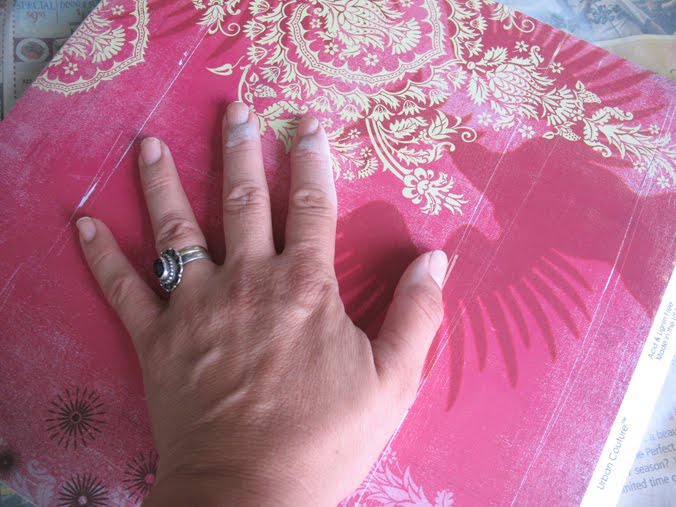
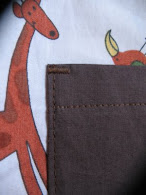
CAREFULLY match up the edges of the paper and the wood, and lay the paper down. It will be very hard if not impossible to reposition it, so take this step slow. Smooth it on, making sure to press on the edges and corners, too. My scrapbooking paper had this white edge with their info on it that I had to cut off.

Now you make the grid for where you want to put the hooks. I did nine hooks, so I divided my board into a grid of two inch squares. How I did it was mark an infinitesimal dot at the edges on two opposing sides at each two inch mark. Lay a straight edge of the ruler along the line between a mark on one side, and the opposing mark on the other side, and mark a tiny dot at each two inch mark. You should end up with a grid of nine dots in the middle, spaced every two inches. (Let me know if I got this step wrong. I SUCK at this kind if mental math, and can't remember if I needed to do anything else to make it work.)

At each dot, take your hammer and nail, and tap it in about 1/8-1/4" (.5 cm approx), to make a starter hole. Pull the nail back out carefully so it doesn't twist and mark up the hole. Don't go farther down, cause pulling it back out will make a mess and cause damage.

Screw the hooks into the starter holes til they are flush with the surface. Make them end all facing up.

Attach my professionally named picture hanger thingie (I'm totally brain fritzing and can NOT remember what these are called) to the back...my one, btw, IS straight, no matter what is bizarrely going on in the picture.

Ta da!!! Turn back around to the front, hang on a wall, and drape your favorite jewellery across it. :D
As always, let me know if I have any errors, and show me if you make one!! :D
Playing along at:


17 comments:
wow that looks really pretty.... love it...
That's just what I need for my bathroom - I think I even have some cup hooks in the shed already.
Bookmarking for later - thanks!
Reminds me of some beautifully decoupaged hooks from Anthropologie which I found in an old catalogue. I think they were mounted on wood and your hanger looks very much like it. Thanks so much for sharing. Did you distress the paper or did it come this way?
Thanks you for posting this :P I thought I had it pretty much figured out, but you saved me a buncha bunch of time by posting this (ie., I wouldn't have thought to make starter holes...my match skills SUCK...even on paper...not just mentally ;), and I was going to just goop some glue on back...didn't think of spray adhesive!)
Okay, that's it...making mine today!! :D
Annekata-Now I need to go find those Anthro pages..they sound gorgeous! :D My paper came that way. I got it in a bulk leftover scrap bag at a discount craft store in Australia..I have NO idea how I lucked out on such a GORGEOUS piece! :D But I lugged it all the way from Australia with me, cause I knew I wanted to do SOMETHING with it. :p
Tuesday-1. Hilarious you spelled math the same way I originally did, and then had to go edit my post to fix it. :p
2. Yah, spray adhesive totally rocks, and your paper won't warp, either.
What a great idea and fun project!! Love the color too! (gotta love pink!!)
Thanks so much for voting for my arbor at the DIY Club Showoff! It is so exciting to be one of the finalist!!
bee blessed
mary
great tutorial!
The hanger thingy is called a sawtooth hanger ;)
I love your jewelry hanger! That paper is wonderful! You did a wonderful job --- and great tutorial!! :)
Hi,
i really like your creativity,it's so unique and wonderful idea,i love your jewellery hanger.
Diamond Hoop Earrings
Love this idea. What a gorgeous piece of art! Fantastic job! Thanks so much for joining the Sunday Showcase. Hope you have a wonderful week! ~ Stephanie Lynn
I've given you a blog award :) Details are at my blog.
I love jewelry hangers. I like being able to look at everything I have at once to choose what to accessorize with.
Yours turned out great!
Visiting by way of Get your craft on Tuesday.
~Makalani
Makaz Home
Love the paper you used!
I love the paper and it turned out so great. I'm hosting We're Organized Wednesday and would love it if you could come by and join the party. Hope to see you there.
http://organizeyourstuffnow.com
JennTRC-*snork* I don't think I even knew that, which would explain why couldn't remember the name for it for the life of me! lol
THanks for joining We're Organized Wednesday. Have a great week!
I'm trying to comment again...I may have messed it up the first time!
I love this idea and recently did the same thing. I wish I saw this before I made mine though since I first thought of using a peg board and after wandering around the store with a huge piece of peg board and pegs, I decided to use plywood and cup hooks. If I saw this first, I wouldn't have had to waste time thinking on my own. haha
Post a Comment